Thursday 2 February 2017

What is the Difference Between Unix and Linux?


How does the statement “Linux exists thanks to Unix” make you feel? Are you confused because you hear Linux users praise Linus Torvalds for his achievement with Linux every now and then but never for Unix?

Your confusion will end today because today we will be explaining what exactly Unix is and how it differs from the more famous Operating System, Linux.

What is Unix?


Unix is a proprietary Operating System that was developed by Bell Labs research center in the 1970s by Ken Thompson, Dennis Ritchie, and a number of other developers.

Its main mode of interaction is the Command Line Interface (CLI), and even though it recently has a GUI, most Unix users I know still prefer to use the CLI.

Because Unix is proprietary software, it is neither available for free nor is its source code open-source. Nevertheless, due to how much its popularity grew it began to be Licensed to different tech companies which subsequently allowed for the existence of multiple flavors.

Unix Compatibility and Distros


Unix finds most of its use in companies and institutions that employ high-end computer systems, mainframes, and mega servers to get computation done and therefore requires certain architecture specifications.

It has support for a few file systems including gps, hfs, js, bfs, vets, and zfs.

Unix has a handful of distros namely:
  • AIX (IBM)
  • BSD
  • HP – UX
  • Iris>
  • Solaris

It also has some open source projects and they include:
  • Free BSD
  • Darwin (Apple’s version of Unix)
  • OpenBSD

What is Linux?


Linux, itself, is a kernel that was developed by Linux Torvalds in 1991 based on the Unix OS as a personal project he worked on and felt he should show to other computer programmers like himself.

After sculpting the kernel after MINIX, adding driver support and a GUI, he developed it into a full-blown OS named Linux and changed the trend in computer technology worldwide.

The Linux OS was built to not just be open source but also easy to use, free, lightweight, and compatible with a variety of hardware. Initially developed to be an OS for personal computing, Linux grew in quality and capacity to the extent it began to be used in offices, servers, etc.

Linux is maintained by Linus Torvalds and a community of developers from all over the world who have volunteered to work on the open-source project free of charge. However, only Mr. Torvalds can authenticate changes made to the kernel’s source code.

Linux Compatibility and Distros


The Linux OS is compatible with a lot of file systems including xfs, ramfs, vfat, cramfsm ext3, ext4, ext2, ext1, ufs, autofs, devpts, and NTFS, to mention a few.

It has a lot more distro versions than Unix including:
  • ArchLinux
  • Debian
  • CentOS
  • Fedora
  • Kali Linux
  • Ubuntu
  • Red Hat

These distros usually go further to have their own flavors like in the case of Ubuntu with Lubuntu and Edubuntu.

Once upon a time, Unix was the definite choice for reliable service by major enterprises around the world, but now Linux has become the most sort-out option because it is now capable of carrying out as many tasks as Unix could reliably, securely, more cost efficiently, and it is more user-friendly.

Of the world’s top 500 servers Linux powers 98%. It’s no wonder you hear Linux almost anytime you hear open source and not so much when you hear Unix. However, don’t forget, that if it weren’t for Unix and the scientists at Bell labs research center you probably wouldn’t be reading this article today.

How much do you know about the difference between Unix and Linux? Did I leave any important details out? Share your thought in the comments section below.

Monday 23 January 2017

Deployment automation using AWS Code Depoly


Codedeploy is one of the deployment service by AWS. The application can be deployed using either a s3 bucket or a git repository which contains the deployable content like code, scripts, configurations files, executables etc.

In this blog post, we are going to deploy a wordpress application in an elastic, highly available and scalable environment using codedeploy.

Get things ready


Get a copy of the WordPress source code in the local system using git command:

git clone https://github.com/WordPress/WordPress.git /tmp/WordPress  

Create Scripts to run your Application. Make a directory .scripts in the WordPress folder:

mkdir -p /tmp/WordPress/.scripts 

Create the following shell scripts in the .scripts folder: sudo vim install_dependencies.sh:

#!/bin/bash
yum groupinstall -y "PHP Support"  
yum install -y php-mysql  
yum install -y nginx  
yum install -y php-fpm  

Next sudo vim stop_server.sh:

#!/bin/bash
isExistApp=`pgrep nginx`  
if [[ -n  \$isExistApp ]]; then  
   service nginx stop
fi  
isExistApp=`pgrep php-fpm`  
if [[ -n  \$isExistApp ]]; then  
    service php-fpm stop
fi  

one more, sudo vim start_server.sh:

#!/bin/bash
service nginx start  
service php-fpm start  

and finally, sudo vim change_permissions.sh:

#!/bin/bash
chmod -R 755 /var/www/WordPress  

Make these scripts executable with this command:

chmod +x /tmp/WordPress/.scripts/*  

CodeDeploy uses an AppSpec file which is a unique file that defines the deployment actions you want CodeDeploy to execute. So along with the above scripts, create a appspec.yml file
sudo vim appspec.yml

version: 0.0  
os: linux  
files:  
  - source: /
    destination: /var/www/WordPress
hooks:  
  BeforeInstall:
    - location: .scripts/install_dependencies.sh
      timeout: 300
      runas: root
  AfterInstall:
    - location: .scripts/change_permissions.sh
      timeout: 300
      runas: root
  ApplicationStart:
    - location: .scripts/start_server.sh
      timeout: 300
      runas: root
  ApplicationStop:
    - location: .scripts/stop_server.sh
      timeout: 300
      runas: root

Now zip the WordPress folder and push it to your git repository.

Creating IAM Roles


Create an iam instance profile and attach AmazonEC2FullAccess policy and also attach the following inline policy:

{
    "Version": "2012-10-17",
    "Statement": [
        {
            "Action": [
                "s3:Get*",
                "s3:List*"
            ],
            "Effect": "Allow",
            "Resource": "*"
        }
    ]
}


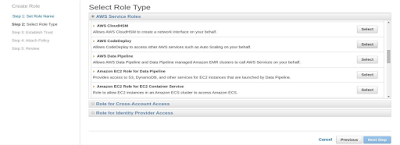
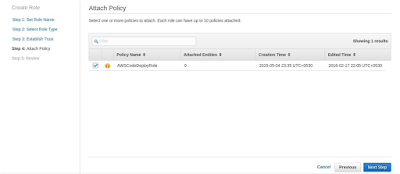
Create a service role CodeDeployServiceRole. Select Role type AWS CodeDeploy. Attach the Policy AWSCodeDeployRole as shown in the below screenshots:


How about Scale?

Create an autoscaling group for a scalable environment. Steps below:

Choose an ami and select an instance type for it:


Attach the iam instance profile which we created in the earlier step:


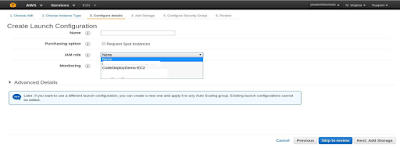
Now go to Advanced Settings and type the following commands in “User Data” field to install codedeploy agent on your machine (if it’s not already installed on your ami):

#!/bin/bash
yum -y update  
yum install -y ruby  
yum install -y aws-cli  
sudo su -  
aws s3 cp s3://bucket-name/latest/install . --region region-name  
chmod +x ./install  
./install auto

where, bucket-name represents one of the following based on the instances in the specified region:
  • aws-codedeploy-us-east-1
  • aws-codedeploy-us-west-2
  • aws-codedeploy-us-west-1
  • aws-codedeploy-eu-west-1
  • aws-codedeploy-eu-central-1
  • aws-codedeploy-ap-southeast-1
  • aws-codedeploy-ap-southeast-2
  • aws-codedeploy-ap-northeast-1
  • aws-codedeploy-ap-south-1
  • aws-codedeploy-eu-west-2
  • aws-codedeploy-ca-central-1
  • aws-codedeploy-us-east-2
  • aws-codedeploy-ap-northeast-2
  • aws-codedeploy-sa-east-1

and region-name will be one of the following:

  • us-east-1
  • us-west-2
  • us-west-1
  • eu-west-1
  • eu-central-1
  • ap-southeast-1
  • ap-southeast-2
  • ap-northeast-1
  • ap-south-1
  • eu-west-2
  • ca-central-1
  • us-east-2
  • ap-northeast-2
  • sa-east-1

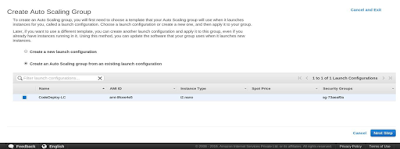
Select Security Group in the next step and create the launch configuration for the autoscaling group. Now using the launch configuration created in the above step, create an Autoscaling group.

Select the launch configuration from the given options:


Give the name of the group in the next screen and select a subnet for it.


Keep the remaining settings at its default and create the autoscaling group.

Time to Deploy

Choose Create New Application. Give some name for the application and a name for the deployment group as well.


Select Autoscaling Group in Search By Tags field to deploy the application on the group and select CodeDeployDefault.OneAtATime in the Deployment Config field.


Select ServiceRoleARN for the service role which we created in the “Creating IAM Roles” section of this post. Go to Deployments and choose Create New Deployment. Select Application and Deployment Group and select the revision type for your source code (i.e. an S3 bucket or a GitHub repository).


On the successful deployment of the application, something like this will appear on the screen:


The WordPress is now deployed on the AutoScaling Group. So when you hit the public IP of the instance which belongs to the autoscaling group, nginx test page will load.

Configurring WordPress 

Since nginx needs php-fpm to work with php pages, we need to configure php-fpm. Also we need to configure WordPress script as well. For this we need to do certain changes in the files as shown below:

sudo vim /etc/php.ini  

Uncomment cgi.fix_pathinfo=0 and change the value from 1 to 0.

sudo vim /etc/php-fpm.d/www.conf

Change user=nginx and group=nginx and also make sure the following values are uncommented:

  pm.min_spare_servers = 5
  pm.max_spare_servers = 35

Add this following script to the configuration file sudo vim /etc/nginx/conf.d/virtual.conf

server {  
listen 80;  
server_name example.com;  
location / {  
    root /var/www/WordPress;
    index index.php index.html index.htm; 
    if (-f $request_filename) {
    expires 30d;
    break;
    }
    if (!-e $request_filename) {
    rewrite ^(.+)$ /index.php?q=$1 last;
    }
    } 
location ~ .php$ {  
    fastcgi_pass   localhost:9000;  #port where FastCGI processes were spawned
    fastcgi_index  index.php;
    fastcgi_param SCRIPT_FILENAME   
    /var/www/WordPress$fastcgi_script_name; #same path as above
fastcgi_param PATH_INFO $fastcgi_script_name;  
include /etc/nginx/fastcgi_params;  
}
}

Hit the server name on the browser and It will load the WordPress Application.To avoid this manual work of configuring the application for other instances in the AutoScaling Group, you can create an image of the instance in which you have done these changes and provide the ami of the created image to the Launch Configuration and update the Launch Configuration in the AutoScaling Group. Hence, the new instances will be created with the updated image.


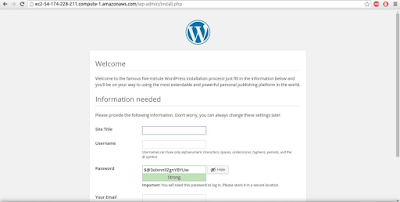
After the successful installation, the wordpress dashboard will appear as shown in the below screenshot:


Make It Stateless 

If you would like to scale at will and deploy at will, you need to make sure that the web/app is stateless. Make sure that you manage plugins in github repo and static content is stored outside the server, on S3.

To store the static media content of your WordPress Application in an S3 Bucket, we will need a plugin named WP Offload S3.
This plugin automatically copies the media files uploaded by WordPress into an S3 bucket. But this plugin has a dependency on another plugin, Amazon Web Services

So, after downloading the both plugins, we got the two zip files of these plugins now. Unzip these files to WordPress/wp-content/plugins path. If not already done, zip the WordPress folder again, push it to the git repository and redeploy the application through CodeDeploy using the CommitID of the latest commit.


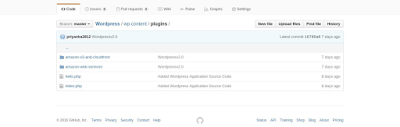
Go to plugins, the two plugins(Amazon Web Services and WP Offload S3) will be shown. Activate these two plugins. Also, after activating the Amazon Web Services plugin, AWS console will be added to the left bar. Go to AWS and define your Access keys and Secret keys in the wp-config.php.


After activating the WP Offload S3, go to its Settings and enter the name of the bucket in which you want to store the media contents of your blog posts. Save the settings.


Now try posting some media content in your blog post.

A folder wp-content will be created in the S3 bucket and the content will get stored in the same folder.

Let there be a loadbalancer 

We are now almost done. In order to achieve the 'highly available' part of our initial goal, lets create a loadbalancer :)

Create an Elastic Load Balancer for high availability of your application. Give it a name.


Select a security group for it in the next screen and configure the health checks:


Review and Create.
Now, Attach this ELB with the autoscaling group:


Also, to access the application through the ELB endpoint, add the public DNS of the ELB to the server_name in /etc/nginx/conf.d/virtual.conf.

Happy CodeDeploy-ing! :)

Restrict IAM User to Particular Route53 Hosted Zone


Through AWS Internet Access Management (IAM) it’s possible to add people to manage all or parts of your AWS account. It takes just a few minutes to setup permissions, roles, and a new user but one item I battled to find was how to restrict the permissions of a certain user or group.

So, without further delay, here is the change that is needed to restrict permissions to a certain domain in IAM:


  • Setup your new User and Permissions (and Roles if needed).
  • From within Route 53 copy the Hosted Zone ID for the domain you want to allow access.
  • From the IAM dashboard Create a new policy:
  • Change the Hosted zone ID with your hosted zone ID which you want to restrict.
{  
   "Version": "2012-10-17",
   "Statement":[
      {
         "Action":[
            "route53:ChangeResourceRecordSets",
            "route53:GetHostedZone",
            "route53:ListResourceRecordSets"
         ],
         "Effect":"Allow",
         "Resource":[
            "arn:aws:route53:::hostedzone/<Your zone ID>"
         ]
      },
      {
         "Action":[
            "route53:ListHostedZones"
         ],
         "Effect":"Allow",
         "Resource":[
            "*"
         ]
      }
   ]
}

AWS CodeDeploy Using S3

AWS has a great set of tools which helps simplify the deployment process in their cloud and one such tool is AWS CodeDeploy.  In this blog, we will deploy the application using AWS CodeDeploy using S3.

Consider a use case where you have 20 instances and you want to deploy your code or change the configuration file of these instances. The only solution would be to login into each particular instance and then change the configuration file. AWS CodeDeploy lets you do this in just a few steps. You just create a deploy application and your code will be deployed in all these 20 instances.

Deploying code without using AWS CodeDeploy


Deploying code without using AWS CODE DEPLOY
                   

Deploying code using AWS CodeDeploy


Deploying code using AWS CODE DEPLOY
There are two ways to deploy code in Amazon Web Services:-
  • Using GIT 
  • Using AWS S3 (Simple Storage Service)

Here, we will deploy the code using Amazon S3 service. Let us also understand few useful terms which will be used in the deployment process:
  • AppSpec file: - It is an Application Specification file. It is a unique file that defines a series of deployment actions that you want CodeDeploy to execute.
  • Deployment Application: - The unique name which will be given to your Deployment Application.
  • Revision: - It is a combination of AppSpec file and other files such as scripts, images, index files, media etc.
  • Deployment Group: - It is defined as a group of individual instances and auto-scaled instances.
  • Deployment Configuration: - It lets you side that how you want your code to be deployed: - one at a time/ half at a time/ all at once.

Deploying Code Using AWS S3

We’ll take a simple example to deploy the code using S3. We are deploying the code in a single instance and are launching a single t2.micro instance. Launch the instance and install Nginx in it as we are going to change the front page or index.html of the Nginx default configuration. You can install Nginx by logging into the instance and typing the following commands: 

$sudo apt-get update 
$sudo apt-get install nginx -y

Now let's move towards Code Deploy into an instance

Before starting with CodeDeploy, we need to have:-
  • Two IAM ROLES: one role will be given to EC2-instances to access s3 buckets and the other role is given to CodeDeploy service to choose Ec2-instances based on their tags.
  • One S3 bucket containing the appspec file, scripts and other files into a tar,gz or bz2 file (compressed format file). You need to store the compressed file into the S3 bucket. The files will automatically be uncompressed at the time of Deployment.
IAM Role Given to AWS CodeDeploy to access your EC2-instance:
=======================================================================
{
"Version": "2012-10-17",
 "Statement": [
    {
      "Action": [
         "autoscaling:PutLifecycleHook",
         "autoscaling:DeleteLifecycleHook",
         "autoscaling:RecordLifecycleActionHeartbeat",
         "autoscaling:CompleteLifecycleAction",
         "autoscaling:DescribeAutoscalingGroups",
         "autoscaling:PutInstanceInStandby",
         "autoscaling:PutInstanceInService",
         "ec2:Describe*"
                 ],
  "Effect": "Allow",
  "Resource": "*"
    }
               ]
 }
=======================================================================
IAM Role Given to EC2-instances to access S3 Buckets
=======================================================================
{
"Version": "2012-10-17",
"Statement":
     [
         {
             "Action":
                   [
                     "s3:Get*",
                     "s3:List*"
                   ],
             "Effect": "Allow",
             "Resource": "*"
         }
     ]
}
=======================================================================

Trusted Relationship With AWS CodeDeploy IAM Role

{
“Version”: “2012-10-17″,
“Statement”: [
    {
    “Sid”: “”,
    “Effect”: “Allow”,
    “Principal”: {
    “Service”:
           [
        "codedeploy.us-east-1.amazonaws.com",
        "codedeploy.us-west-2.amazonaws.com"
           ]
                 },
    “Action”: “sts:AssumeRole”
    }
             ]
}
We also need to install AWS CodeDeploy Client to our instance. It will allow the code to be deployed into the instance. You can install the code-deploy client onto your instance by the following process:
Installing AWS CLI and AWS CodeDeploy Agent on Ubuntu 14.04 LTS :
$sudo apt-get update
$sudo apt-get install awscli
$sudo apt-get install ruby2.0
$cd /home/ubuntu
$sudo aws s3 cp s3://aws-codedeploy-us-east-1/latest/install . --region us-east-1
$sudo chmod +x ./install
$sudo ./install auto

Understanding APPSPEC FILE

AppSpec is the heart of CodeDeploy and is written in YAML. AppSpec defines how the application code will be deployed on deployment targets and which deployment lifecycle event hooks to run in response to various deployment lifecycle events. It should be in the root of an application source code’s directory structure.
High-Level Structure of AppSpec File:

1                              version: 0.0
2                   os: operating-system-name
3          files: source-destination-files-mappings
4          permissions: permissions-specifications
5      hooks: deployment-lifecycle-event-mappings
Hooks: scripts to run at specific deployment lifecycle events during the deployment. The available event hooks are:
ApplicationStop: events to be performed when application is stopped
DownloadBundle: occurs when CodeDeploy agent downloads bundle from S3 bucket
BeforeInstall: occurs before AWSCodeDeploy starts deployment of application code to deployment target
Install: AWSCodeDeploy copies files to deployment targets
AfterInstall: occurs once files are copied and installed to deployment targets
ApplicationStart: occurs just before your application revision is started on the deployment target
ValidateService: occurs after the service has been validated
The sample AppSpec file used is as shown below:

version: 0.0
os: linux
files:
- source: /
destination: /usr/share/nginx/html
hooks:
BeforeInstall:
- location: scripts/install_dependencies.sh
timeout: 300
runas: root
AfterInstall:
- location: scripts/afterinstall
timeout: 300
runas: root
ApplicationStart:
- location: scripts/start_server
timeout: 300
runas: root
ApplicationStop:
- location: scripts/stop_server
timeout: 300
runas: root
While creating an instance you need to attach the s3 bucket role with your instance and after that, you need to install AWS CLI and AWS Code Deploy Agent using the above procedure. Now you are ready to create the CodeDeploy Application.

Creating AWS CodeDeploy Application

Sign in to the AWS Console. Go to the services and click on “Code Deploy”  as shown below.

Selection_005

Now a new window will open as shown below. Click on “Create New Application” button. It will open up the prompt to create a new application.


Selection_004

A new window will appear which ask about the details for creating an application.  Enter Application Name, Application Group Name and choose instances to which you want to deploy the code using the Key and Value. Choose your Deploy Configuration: -  One at a time /Half at a time /All at a time. This configuration lets you choose how you want to deploy your code.


Selection_006

Enter the application name and Application Group Name.

Selection_007

Choose instances based om their Key and Value

Selection_008

Then Click on “CREATE APPLICATION ” button. Your application will be created and a new window will appear as shown below.  


Selection_010

You have to create a new revision. Click on Deploy New Revision button to create a new revision.

Selection_013

Now enter the  Application Name, Deployment Group Name. Choose Revision type:- “My application is stored in Amazon S3.”. Give the Revision Location i.e. location of Bucket and the file name. (You can also copy the full path of file from AWS S3 and paste it here). After entering all the details, click on Deploy Now. Now your application and code is being deployed. Wait for few seconds and then refresh.

Selection_012
Selection_014

The status will appear as Succeeded. You can now hit the IP of your instance and you will get the index page that you deployed.
Hope this will help you!

Automating Windows Server backups on Amazon S3


1: Create an Amazon AWS account


If you don't already have an AWS account - create it here, it's free. Amazon's "free usage tier" on S3 gives you 5GB free storage from scratch, so after registering, sign in to your "AWS Management Console", select the "S3" tab and create one or more "buckets".

2: Get your access keys


You will need security credentials to access your online storage from the server, so click your account name - "Security Credentials" - "Access Keys" and copy your Key ID and Secret.

3: Download "S3Sync"


"S3Sync" is a great free command-line application from SprightlySoft. It is .NET-based and even comes with the source codes. At the time of writing this post their website was down, so I published the tool on Google Docs here: S3Sync.zip.

The tool syncs a given folder with your S3 bucket. And the best part - unlike similar scripts and utilities it performs a "smart" differential sync that detects additions, deletions, and file modifications.
extract the S3Sync.zip folder to C drive.
Location of S3sync folder = C:\S3Sync

4: Write a backup script


Create a batch file and paste this code into it:

cd C:\S3Sync
S3Sync.exe -AWSAccessKeyId xxxxxxx -AWSSecretAccessKey xxxxxxx -SyncDirection upload -LocalFolderPath "C:\inetpub\wwwroot" -BucketName YOURBUCKETNAME


The code above is pretty self-explanatory. Just replace the "xxxxxx" with your access codes from #2, "YOURBUCKETNAME" with the name of your S3 bucket, and "C:\inetpub\wwwroot" - with the folder you want to backup. Then create a scheduled task that runs the batch file every 24 hours, and you're all set.

Hope this will help you!

Thursday 19 January 2017

How to Clear RAM Memory Cache, Buffer and Swap Space on Linux


Like any other operating system, GNU/Linux has implemented a memory management efficiently and even more than that. But if any process is eating away your memory and you want to clear it, Linux provides a way to flush or clear ram cache.

How to Clear Cache in Linux?


Every Linux System has three options to clear cache without interrupting any processes or services.

1. Clear PageCache only.

# sync; echo 1 > /proc/sys/vm/drop_caches

2. Clear dentries and inodes.

# sync; echo 2 > /proc/sys/vm/drop_caches

3. Clear PageCache, dentries and inodes.

# sync; echo 3 > /proc/sys/vm/drop_caches 


Explanation of above command.


sync will flush the file system buffer. Command Separated by “;” run sequentially. The shell waits for each command to terminate before executing the next command in the sequence. As mentioned in kernel documentation, writing to drop_cache will clean cache without killing any application/service, command echo is doing the job of writing to file.

If you have to clear the disk cache, the first command is safest in enterprise and production as  “...echo 1 > ….” will clear the PageCache only. It is not recommended to use the third option above  “...echo 3 >” in production until you know what you are doing, as it will clear PageCache, dentries, and inodes.


Is it a good idea to free Buffer and Cache in Linux that might be used by Linux Kernel?


When you are applying various settings and want to check, if it is actually implemented specially on I/O-extensive benchmark, then you may need to clear buffer cache. You can drop cache as explained above without rebooting the System i.e., no downtime required.

Linux is designed in such a way that it looks into disk cache before looking onto the disk. If it finds the resource in the cache, then the request doesn’t reach the disk. If we clean the cache, the disk cache will be less useful as the OS will look for the resource on the disk.

Moreover, it will also slow the system for a few seconds while the cache is cleaned and every resource required by OS is loaded again in the disk-cache.

Now we will be creating a shell script to auto clear RAM cache daily at 2 am via a cron scheduler task. Create a shell script clearcache.sh and add the following lines.

#!/bin/bash
# Note, we are using "echo 3", but it is not recommended in production instead use "echo 1"
echo "echo 3 > /proc/sys/vm/drop_caches"
Set execute permission on the clearcache.sh file.

# chmod 755 clearcache.sh

Now you may call the script whenever you required to clear ram cache.

Now set a cron to clear RAM cache everyday at 2 am. Open crontab for editing.

# crontab -e

Append the below line, save and exit to run it at 2 am daily.

0  2  *  *  *  /path/to/clear cache.sh

For more details on how to cron a job, you may like to check our article on 11 Cron Scheduling Jobs.

Is it the good idea to auto clear RAM cache on the production server?


No! it is not. Think of a situation when you have scheduled the script to clear ram cache everyday at 2am. Everyday at 2am the script is executed and it flushes your RAM cache. One day for whatsoever reason, may be more than expected users are online on your website and seeking resource from your server.

At the same time scheduled script run and clears everything in cache. Now all the user are fetching data from disk. It will result in server crash and corrupt the database. So clear ram-cache only when required,and known your foot steps, else you are a Cargo Cult System Administrator.

How to Clear Swap Space in Linux?


If you want to clear Swap space, you may like to run the below command.

# swapoff -a && swapon -a

Also you may add above command to a cron script above, after understanding all the associated risk.

Now we will be combining both above commands into one single command to make a proper script to clear RAM Cache and Swap Space.

# echo 3 > /proc/sys/vm/drop_caches && swapoff -a && swapon -a && printf '\n%s\n' 'Ram-cache and Swap Cleared'
OR
$ su -c "echo 3 >'/proc/sys/vm/drop_caches' && swapoff -a && swapon -a && printf '\n%s\n' 'Ram-cache and Swap Cleared'" root

After testing both above command, we will run command “free -h” before and after running the script and will check cache.


That’s all for now, if you liked the article, don’t forget to provide us with your valuable feedback in the comments to let us know, what you think is it a good idea to clear ram cache and buffer in production and Enterprise?